Wednesday 29 March 2017

Introducing: Mom Crafts

I've got a fun new book to show you guys today: Mom Crafts: DIY Crafts for the Expectant Mom.


It features 20 projects to make for new babies and their expectant parents... including three projects designed and stitched by me!

 https://www.amazon.co.uk/gp/product/1454710144/ref=as_li_qf_sp_asin_il_tl?ie=UTF8&camp=1634&creative=6738&creativeASIN=1454710144&linkCode=as2&tag=bugandfis-21

The book includes projects to knit, embroider and sew (hand sewing and machine sewing). The "Mom" section includes a maternity pillow, a nursing bag and a lavender eye pillow. The "Baby" section includes burp cloths, bins and that adorable strawberry hat and booties. Then the "Nursery" section includes lots of decorative items to brighten up the nursery and celebrate the new arrival.


My three projects all involve felt, of course! (You'd probably guessed that, hadn't you?)

There's a night sky mobile to hang over the crib.


Then there's colourful and customisable hoop art (look, it's baby me! wasn't I cute?), which you can make with felt or some simple embroidery.


My favourite project of the three though has to be the whale pillow/cushion which doubles as a photo prop for marking those important milestones!


I showed my dad this book and pointed out my projects and he said "You made a baby? Just for a book? How much were they paying you???", haha.

Seriously though, how cute are these little people? Such sweet pictures!


Mom Crafts is published by Lark Crafts. It's available from Amazon UK, Amazon USA, The Book Depository and lots of other bookshops. Please note: The Amazon and Book Depository links in this post are affiliate links.


It's always a joy working on projects for Lark Crafts titles - I've contributed to quite a few over the years! Do you have any of these? :)

Sew Sweet CreaturesBanners, Buntings, Garlands & Pennants

Craft CampSewn Together

Doodle Stitching: The Holiday Motif Collection'Tis the Season to be Felt-y

Heart-Felt HolidaysFelt-o-ween

Stash Happy: FeltFa La La La Felt

Saturday 25 March 2017

5 Free Felt Fruit Sewing Tutorials

UPDATE: my felt fruit patterns are now available in my Patreon pattern library.

-----

I hope you guys have enjoyed the series of free felt fruit tutorials I've shared over the past couple of months!


Felt faux fruit

I thought it would be helpful to collect the links to all 5 tutorials so you can bookmark and find them easily for future crafting. Do let me know if you make any of these - or the whole set! :)

The fruit would look awesome displayed together in a bowl, and individual pieces would make cute ornaments or pincushions. You could also adapt the tutorials to make fun stuff like kiwi slice brooches.

Please note that the finished felt fruit is intended for decorative use only - it is not a toy and should be kept well out of reach of young children.

Felt faux fruit


1. Apple & Pear.

Felt apples and pear


2. Apple & Orange Slices.

 Felt apple slices
Felt orange slices


3. Strawberries.

Felt strawberries


4. Watermelon Slice.

Felt watermelon slice


5. Kiwi Fruit.

Felt kiwi fruit


P.S. Subscribe to my newsletter for a monthly free pattern and visit my crafty tutorial archive for lots more free projects.

Visit my shop to buy my printable PDF sewing patterns:


Wednesday 22 March 2017

Visiting Birmingham: Gorgeous Architecture (and Owls!)

When it comes to travel blogging, I am definitely a tortoise rather than a hare. I go on nice days out and the occasional holiday, I take a bunch of photos with good blogging intentions... then the photos sit on my laptop for weeks, months and sometimes years before seeing the light of day.

I don't see this as a bad thing, really. I'm not on a deadline, after all! I go places for fun, I take photos for fun and then at some point I'll probably blog about what I got up to. No pressure, just blogging about stuff when I feel like it. The only downside is that sometimes it's a bit weird starting a post with "Sooo, I went on holiday two years ago and I'm finally blogging about it! Woohoo!" Ah well.

If you don't like reading about what I got up to on my travels two years ago you should probably stop reading this post right now, because Guess What I'm Finally Blogging About Today? Haha.


In 2014 I went to the Blognix blogging conference in Birmingham and built a mini holiday around it, exploring Birmingham and going on a delightful day trip to Stratford-upon-Avon. I enjoyed my brief visit to the city so much (and, let's be honest here, the cheap hotel prices!) that I decided to go back for a longer visit in the summer of 2015.

That summer I spoke to so many people who were going to really glamorous, far-flung destinations for their holidays. "Are you going anywhere nice this year, Laura?" "Um, I'm going to Birmingham". It doesn't sound like the most exciting holiday, does it? But I had a really brilliant time, crammed loads of great stuff into just a few days and I still have lots of things which I'd love to do/see on a future visit.

So.... what did I actually get up to on my trip? Mostly walking around the city oohing over the architecture and other historical bits and pieces, and exploring the city's excellent museums (I love museums so much).

Before my holidays in Birmingham I have to admit that I'd thought of it as a pretty bland place full of concrete. I'd only ever really been to the NEC and to assorted conferences in bland chain hotels and just had this vague impression that it wasn't really an interesting place to visit. Kind of like a bigger version of Slough?

Of course, I could not have been more wrong. Birmingham is amazing: bustling and vibrant and filled with a fantastic and really visually interesting mix of modern and Victorian architecture. When I visited it was also full of owls, for The Big Hoot trail (so much fun!). (Click here to see all the owls I spotted during my trip).


I really enjoyed wandering round the city with a tourist map in my pocket, looking up at all the interesting buildings and spotting places to explore - galleries to pop into, churches to look round, cafes to have a cuppa in, and so on.


When I visited there were some very striking floral displays in the city including this one commemorating the First World War. Lots of the museums had First World War themed exhibitions as well, it was fascinating and moving to read about the local stories from the war.


I always love learning about local history when visiting a new-to-me place: centuries of people and their stories, and how the place has grown and changed over the years. I know not everyone is a fan of museums, but for me a trip to a little local museum (or the local history gallery of the big local museum!) is a really intrinsic part of my holidays. 


I'll be chatting about one of the Birmingham museums I visited in the next post about my trip ... which I promise you won't have to wait two years for! In the meantime, you can read about my previous (very sunny!) trip to Birmingham here. For more city break goodness, click here for my trip to Manchester and here for my trip to Leeds.

Monday 20 March 2017

Sew Some Felt Fruit! Kiwi Fruit Tutorial

UPDATE: my felt kiwi tutorial is now available in my Patreon pattern library.

Subscribe for a small monthly fee and you'll get access to a growing library of PDF patterns and tutorials, with an email whenever I add a new project. You can cancel any time.      

Click here to check out my Patreon page and sign up!

-----

Time for the final project in my felt fruit series: sewing some kiwi fruit halves!

 felt kiwi fruit halves
 felt kiwi fruit

I hope you guys have enjoyed this series - do let me know if you make any felt fruit to decorate your homes! The individual felt projects would look cute sitting on a bookshelf, and if you made all the fruit they'd look fantastic displayed together in a bowl.

Follow the links to find the tutorials for the earlier projects: apples and pear, orange and apple slices, strawberries and watermelon slices.

Please note that the finished felt fruit is intended for decorative use only - it is not a toy and should be kept well out of reach of young children.

felt fruit

This project was originally published in docrafts Creativity magazine and stitched using felt from their Craft Planet range.

 felt kiwi halves
felt kiwi fruit


 felt kiwi halves


 felt kiwi fruit

Please note that the finished felt fruit is intended for decorative use only - keep it well out of reach of young children.
 
P.S. Subscribe to my newsletter for creative updates, and visit my crafty tutorial archive for lots of free projects.

Visit my shop to buy my printable PDF sewing patterns:


Saturday 18 March 2017

54 Instagram Hashtags for Colour Lovers

I love colour. The brighter the better!

When I first joined Instagram I loved it but felt a little out of place - so many of the accounts I followed were full of muted and minimal colours: a sea of soft greys and browns and lots of white space.

But of course, there are loads of colour-lovers on Instagram and loads of great hashtags for sharing your colourful photos or finding new colour-filled accounts to follow. So I thought it might be helpful to share some of my faves in a blog post in case other people are struggling to find the colourful side of Instagram.

(Well this post started out as a short list of my faves... and I got a bit carried away! The more colour-focused hashtags the better, right??)

https://www.instagram.com/lauralupinhoward/

Before I begin - one of the tricky things about colour themed hashtags is that there are two different ways to spell colour (or color). If there are two popular versions of a tag I'll in this list along with the current numbers of photos shared under each, so you can see how they compare. Usually the American spelling is most popular, but not always!

Ready to fill your Instagram feed with colour? Here goes...

1. #ihavethisthingwithcolor (150K) #ihavethisthingwithcolour (16K)

2. #ihavethisthingwithpink (100K)

3. #abmlifeiscolorful (1.5 million)

4. #capturingcolor (16K) #capturingcolour (78K)

5. #colorcolourlovers (123K)

6. #colorventures (283K) #colourventures (4K)

7. #dscolor (825K)

8. #dspink (38K)

9. #livecolorfully (1.4 million) #livecolourfully (60K)

10. #candyminimal (318K)

11. #colormehappy (116K) #colourmehappy (63K)

12. #colorinspiration (114K) #colourinspiration (56K)

13. #colorlove (146K) #colourlove (51K)

14. #colorlover (50K) #colourlover (8K)

15. #colorlovers (28K)  #colourlovers (25K)

16. #colorgram (354K) #colourgram (5K)

17. #dailydoseofcolor (39K) #dailydoseofcolour (1K)

18. #colormyjoy (3K) #colourmyjoy (9K)

19. #colors_ofourlives (225K) #colors_ofourlives (3K)

20. #colorsplash (977K) coloursplash (290K)

21. #brightcolors (386K) #brightcolours (122K)

22. #ilovecolor (102K) #ilovecolour (21K)

23. #coloraddict (37K) #colouraddict (8K)

24. #colorblockvibes (3K)

25. #happycolors (73K) #happycolours (23K)

26. #colorsorganizedneatly (1K)

27. #popyacolor (45K) #popyacolour (411K)

28. #colorhunting (11K) #colourhunting (8K)

29. #colorhunter (10K)

30. #popsofcolor (20K) #popsofcolour (4K)

31. #allthecolors (76K) #allthecolours (36K)

32. #thatcolorproject (193K) #thatcolourproject (1K)

33. #colourmyhome (10K)

34. #colormyworld (46K) #colourmyworld (18K)

35. #coloryourworld (29K) #colouryourworld (23K)

36. #inspirationiscolour (9K)

37. #showusthecolor (9K)

38. #brightcolorsmakemehappy (8K) #brightcoloursmakemehappy (3K)

39. #candycolors (100K) #candycolours (9K)

40. #colorpalette (136K) #colourpalette (69K)

41. #foundpalettes (7K)

42. #huntgramcolor (39K)

43. #colorsplurge (791K)

44. #colorfullycrafted (21K)

45. #howihue (42K)

46. #colormakesmehappy (11K) #colourmakesmehappy (3K)

47. #craftherainbow (60K)

48. #madeitrainbow (2K)

49. #dsrainbow (16K)

50. #my_flatlayrainbow (less than 1K)

51. #iloverainbows (17K)

52. #colorcrush (126K) #colourcrush (20K)

53. #colorexplosion (30K) #colourexplosion (14K)

54. #color_me_minimal (56K)


Know any other great hashtags for colour lovers? Share them in the comments! 

Click here to check out my colourful Instagram account: lauralupinhoward

Wednesday 15 March 2017

Spring Flowers Felt Easter Egg Ornaments Tutorial

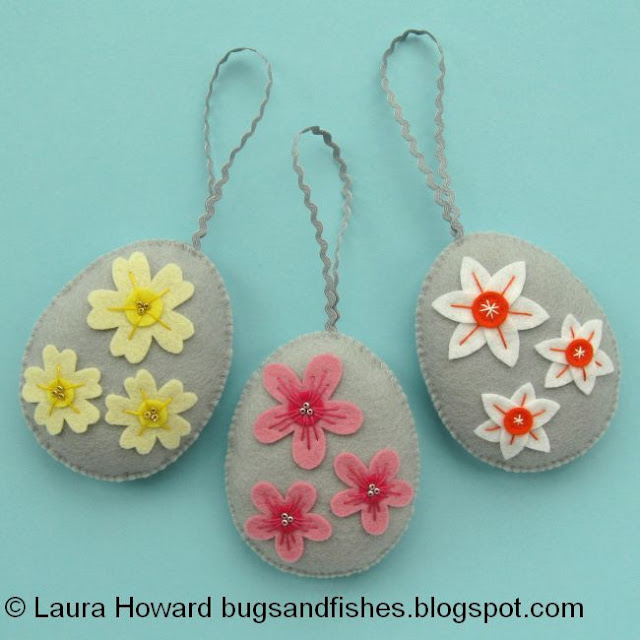
Wool felt easter eggs decorated with spring flowers


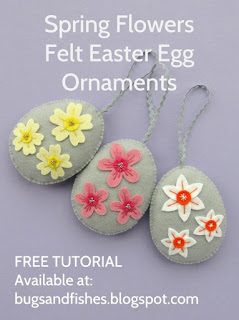
Today I'm delighted to be sharing a free tutorial for sewing felt Easter egg ornaments decorated with pretty spring flowers: primroses, cherry blossoms and narcissi.

Wool felt easter eggs decorated with spring flowers
Wool felt Easter eggs decorated with spring flowers

This post is sponsored by Cloud Craft, who sell 100% wool felt and lots of other supplies for hand stitching projects: fabric, thread, embroidery hoops and tools, buttons and trims, sewing kits, and more!

https://www.cloudcraft.co.uk/

I love their wool felt, it's great quality and comes in a gorgeous range of colours. You can pick the perfect colours for your project or get inspired by their lovely colour collections.

https://www.cloudcraft.co.uk/

These Easter egg ornaments have been stitched with 100% wool felt from the Cloud Craft range - click here to purchase a kit with everything you need to make them!

The felt egg ornaments would make lovely decorations for spring and Easter. You could leave off the ribbon loops to make eggs to display in a bowl, or to use in an indoor Easter egg hunt. You could also mix and match the flowers on the eggs, get creative with your colour scheme, or use the flowers to decorate other things (everything looks better with some flowers on it, right?).

You will need:

The templates provided at the bottom of this post
Grey felt for the eggs
Small amounts of white, pale yellow, bright yellow, pink, bright pink, and orange felt for the flowers.
Co-ordinating ribbon or other trim - I used a lovely grey mini ric rac (20 cm per ornament)
White, orange, yellow and pink embroidery thread
Grey sewing thread
Gold and silver seed beads
Toy stuffing
Sewing needles and pins
Sewing scissors
Embroidery scissors (the small sharp blades of embroidery scissors make them perfect for cutting out small felt shapes)

Optional:
- White, orange, yellow and pink sewing thread
- An air erasable fabric marker

To make the egg ornaments:

1. For each egg you want to make, cut out two egg shapes from grey felt using the template provided.

Cutting out the felt egg shapes

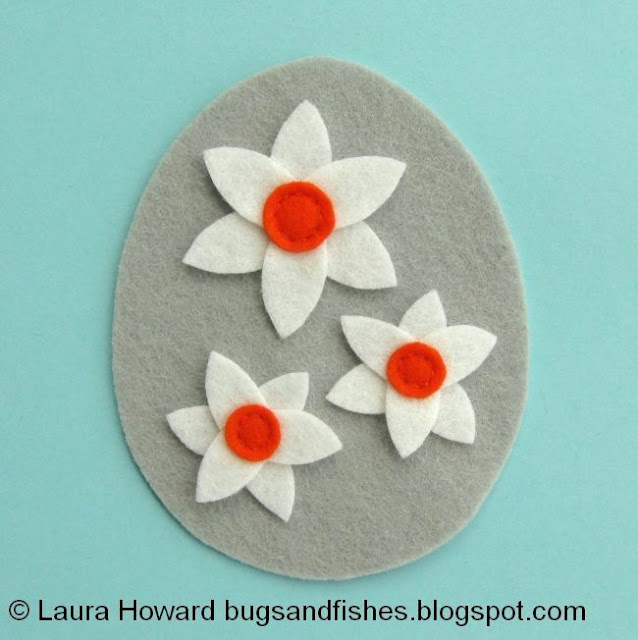
Then use the flower templates to cut out the flower pieces. For the primroses, cut one large and two small primroses from pale yellow felt. For the cherry blossoms, cut one large and two small cherry blossoms from pink felt. For the narcissi, cut two large and four small narcissi from white felt.

cutting out the felt flower pieces

2. Next cut circles for the centres of the flowers. Cut these freehand using the photos as a guide - remember you're aiming for natural shapes so don't worry about cutting perfect circles! You'll need one larger and two smaller circles per egg: bright yellow for the primroses, bright pink for the cherry blossoms and orange for the narcissi.

When cutting small circles, I cut a small square of felt slightly larger than the circle I want to cut. Then I use embroidery scissors to cut in a spiral, cutting out a circle shape. Alternatively you could draw a circle on the felt with an air erasable fabric marker then cut it out.

all the felt pieces, ready to sew

3. For the primroses and cherry blossoms, arrange the flowers and circles as shown and secure eachh of them with an X of two small stitches of matching thread. You can use sewing thread for this, or a single strand of embroidery thread (this is usually made up of six strands - cut a length of thread then separate one strand from the rest to use for your stitches).

sew the circles with an x of two stitches

4. For the narcissi, arrange the white flower pieces so they overlap as shown then secure them with white thread and an X of two small stitches. Again, you can use sewing thread or a single strand of embroidery thread. 

secure the narcissi petals

Then add the orange circles to the centre of the narcissi flowers. Sew around the inside edge of each circle with orange sewing thread (or a single strand of embroidery thread), using backstitch to create a continuous line. If you find backstitch tricky, you could sew small running stitches in one direction then sew back in the other direction to fill in the gaps.

sew the narcissi trumpets with backstitch

5. Now it's time to add the embroidery. Throughout this step, use two strands of embroidery thread in the required colours.

For the primroses: use yellow embroidery thread to sew five long stitches radiating from the centre of each flower, as shown.

add embroidery to the primroses

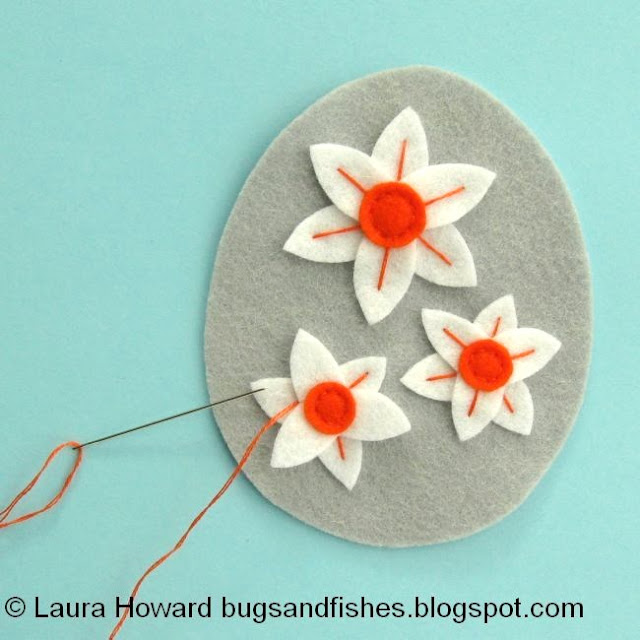
For the narcissi: use orange embroidery thread to sew one long stitch along each petal, as shown. Start your stitches as close to the overlapping felt as possible so the lines seem to be coming right from the centre of the flowers.

add embroidery to the narcissi

Then use white embroidery thread to sew "stars" of overlapping stitches in the centre of each flower. Sew three stitches for each of the small flowers, and four stitches for the large flower. 

 embroidered narcissi
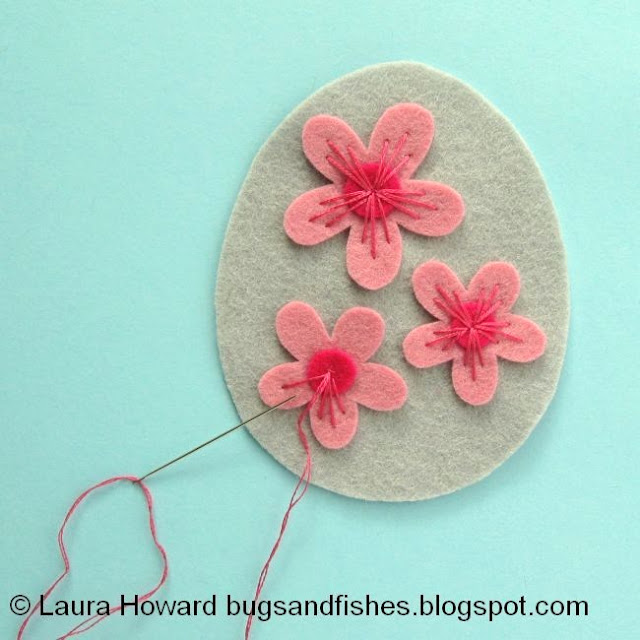
For the cherry blossoms: use bright pink embroidery thread to sew lots of radiating stitches, as shown. For each petal sew one shorter stitch, one long stitch, then another shorter stitch.

add embroidery to the cherry blossoms

If you're sewing a set of three eggs, they should now look like this:

embroidered felt spring flowers

6. Add seed beads to the primroses and cherry blossoms.

Sew three beads in the centre of each flower, sewing each bead flat like an O with two or three stitches of thread. Use sewing thread or a single strand of embroidery thread.

Add gold beads to the primroses with yellow thread, and silver beads to the cherry blossoms with pink thread.

adding seed beads to the flowers

Your eggs will now look like this:

finished felt flowers

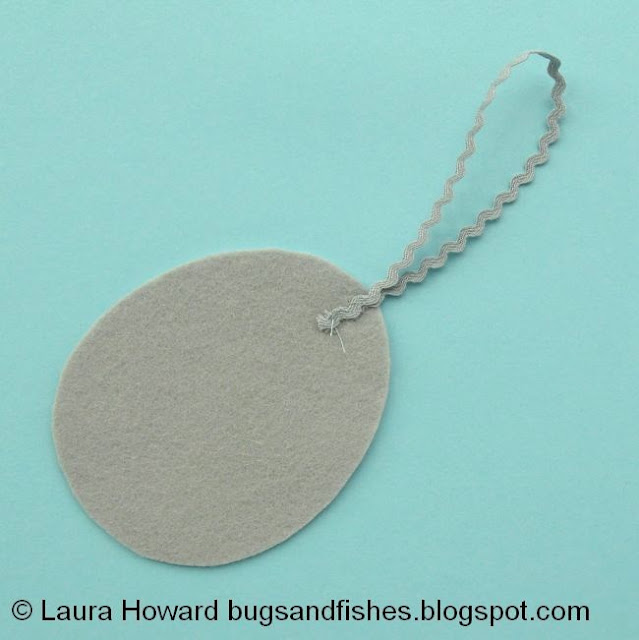
7. If you're making the eggs as ornaments, now's the time to add the loops to hang them.

For each egg cut a 20cm piece of mini ric rac or narrow ribbon. Fold the trim in half to make a loop and sew the ends to the top of an undecorated egg piece. Use whip stitch and grey sewing thread to match the felt, sewing into but not through the felt.

adding the ric rac loop

8. Place the decorated front and undecorated back pieces together, so the ribbon / ric rac ends are sandwiched between then. Use grey sewing thread and whip stitch to join the edges, hiding your knot between the layers when starting your stitching.

Begin near the bottom of the egg and sew up and around it, leaving a gap of a couple of inches (a few centimetres) for stuffing.

sewing up the ornaments

9. Lightly stuff each egg with toy filling, adding small pieces at a time to create an evenly stuffed shape.

Then sew up the remaining gap with more whip stitches, finishing your stitching neatly at the back.

 the finished cherry blossom ornament
the finished narcissi ornament
the finished primrose ornament
the finished wool felt Easter egg ornaments

DISCLOSURE: This post is sponsored by Cloud Craft, who sell 100% wool felt and other handpicked needlework supplies for modern making.

Click here to buy a kit of all the materials you'll need to make the egg ornaments.

Click here to open the template sheet in another tab or window. Make sure you're viewing it full size then print it at 100% - I've included a scale guide so you can check if it's printed the correct size.

This tutorial is for non commercial use only: you can stitch as many eggs as you like for yourself or as gifts, but please don't make any for sale. You may borrow a photo or two if you want to blog about this project, but remember to credit me and link back to the original source, and do not reproduce my tutorial or share the templates on your site. Thanks!

Wool felt Easter ornaments templates

Want to make more fun stuff from felt? Check out my archive of free tutorials.
Wool felt Easter egg ornament tutorialWool felt Easter egg ornament tutorial